Basic Rendering
Rendering molecules “just works” in both Jupyter and Marimo. OpenEye objects are recognized as first-class objects, so by terminating a cell with an object, it will render.
All you have to do is import cnotebook and it takes care of the rest. There are also extensive customization options if you don’t like the defaults!
Molecules
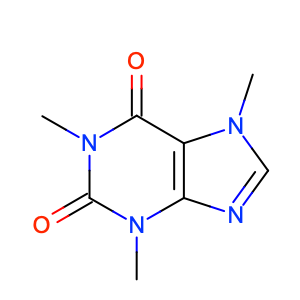
Concrete molecules, such as OEGraphMol and OEMol are straightforwardly
rendered using the global rendering context (more on that later).
import cnotebook
from openeye import oechem

mol = oechem.OEMol()
oechem.OESmilesToMol(mol, "CN1C=NC2=C1C(=O)N(C(=O)N2C)C")

mol
Will output:
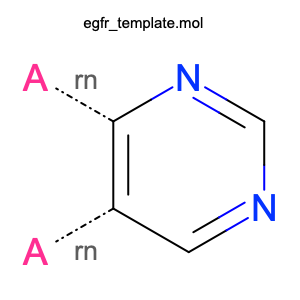
Query Molecules
Query molecules, such as OEQMol can also be displayed.
import cnotebook
from openeye import oechem

qmol = oechem.OEQMol()

with oechem.oemolistream("examples/assets/egfr_template.mol") as ifs:
    oechem.OEReadMDLQueryFile(ifs, qmol)

qmol
Will display:
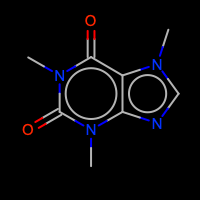
Display Objects
Display objects store many different styling options and are handled natively.
import cnotebook
from openeye import oechem

mol = oechem.OEMol()
oechem.OESmilesToMol(mol, "CN1C=NC2=C1C(=O)N(C(=O)N2C)C")

# Calculate 2D coordinates (since we're using a display object)
oedepict.OEPrepareDepiction(mol)

# Customized display options
opts = oedepict.OE2DMolDisplayOptions(200, 200, oedepict.OEScale_AutoScale)
opts.SetAromaticStyle(oedepict.OEAromaticStyle_Circle)
opts.SetAtomColorStyle(oedepict.OEAtomColorStyle_BlackCPK)
opts.SetTitleLocation(oedepict.OETitleLocation_Bottom)

disp = oedepict.OE2DMolDisplay(mol, opts)

disp
Outputs:
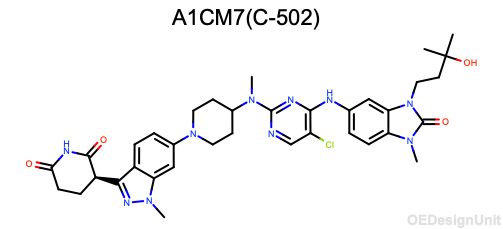
Design Units
OpenEye OEDesignUnit objects are supported natively in both 2D and 3D contexts.
2D Rendering (Marimo)
In Marimo, OEDesignUnit objects are automatically formatted as 2D images
when displayed in a notebook cell. The design unit title and a structure overview
are rendered using the standard CNotebook rendering pipeline.
from openeye import oechem
from cnotebook.c3d import C3D

du = oechem.OEDesignUnit()
oechem.OEReadDesignUnit("examples/assets/spruce_9Q03_ABC__DU__A1CM7_C-502.oedu", du)

# Display it
du
3D Viewing (C3D)
For interactive 3D visualization of design units, use the C3D viewer:
from openeye import oechem
from cnotebook.c3d import C3D

du = oechem.OEDesignUnit()
oechem.OEReadDesignUnit("examples/assets/spruce_9Q03_ABC__DU__A1CM7_C-502.oedu", du)

viewer = (
    C3D()
    .add_design_unit(du, name="complex")
    .set_preset("sites")
    .orient("resi 502")
)
viewer.display()
The design unit’s full complex (all components) is extracted and converted to PDB format for 3Dmol.js. See C3D Interactive 3D Viewer for full documentation of the 3D viewer.
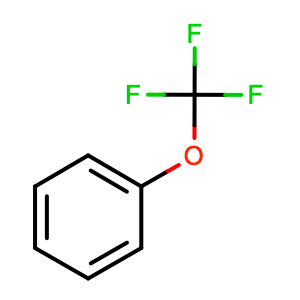
Substructure Highlighting
The highlight_smarts helper makes SMARTS highlighting fun and easy:
Single Molecule:
from cnotebook import highlight_smarts
from openeye import oechem

mol = oechem.OEGraphMol()
oechem.OESmilesToMol(mol, "c1ccc(cc1)OC(F)(F)F")

# Highlight hydroxyl group
highlight_smarts(mol, smarts="C(O)(F)(F)F")
Outputs:
Rendering Contexts
CNotebook uses contexts to control rendering style. You can also provide local rendering contexts to just about anything for extensive customizability.
Global Context
There is a single global context, which you are free to change however you like.
import cnotebook

# Get the global context
ctx = cnotebook.cnotebook_context.get()
This context object has the following attributes that can be set:
Option |
Type |
Default |
Description |
|---|---|---|---|
|
|
|
Image width in pixels. When 0, determined by scale. |
|
|
|
Image height in pixels. When 0, determined by scale. |
|
|
|
Minimum image width in pixels. |
|
|
|
Minimum image height in pixels. |
|
|
|
Maximum image width in pixels. |
|
|
|
Maximum image height in pixels. |
|
|
|
Structure scaling factor (OEScale_Default * 0.6). |
|
|
Scale factor for atom labels (0.5 to 2.0). |
|
|
|
|
Scale factor for title font (0.5 to 2.0). |
|
|
|
Output format: |
|
|
|
Enable bond width scaling based on structure scale. |
|
|
|
Whether to display the molecule title. |
|
|
|
Callbacks to apply to OE2DMolDisplay before render. |
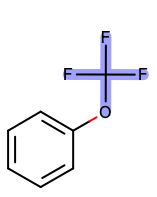
Here is an example of changing the global context to make all molecules a bit bigger, scale bond widths, and turn off displaying titles.
import cnotebook
from openeye import oedepict

# Get the global context
ctx = cnotebook.cnotebook_context.get()

ctx.structure_scale = 2.0 * oedepict.OEScale_Default
ctx.bond_width_scaling = True
ctx.title = False

mol = oechem.OEGraphMol()
oechem.OESmilesToMol(mol, "c1ccc(cc1)OC(F)(F)F")
mol.SetTitle("You won't see this!")

mol
Outputs:
You can always reset the global context:
ctx.reset()
This is useful if you’re interactively making lots of changes.
Local Contexts
Let’s say you only want to limit the scope of your changes. You can copy the global context to a local context and modify it however you like. One cool feature is that if you later modify a part of the global context that hasn’t been explicitly set in the local context, the change will propogate.
You can pass any renderable object (e.g., molecules or DataFrames) to cnotebook.display
with an optional context and it will render.
Environment-Specific Behavior
CNotebook automatically adjusts rendering based on the environment.
You can check the detected environment using the get_env() function:
import cnotebook

env = cnotebook.get_env()

print(f"IPython: {env.ipython_available} ({env.ipython_version})")
print(f"Marimo: {env.marimo_available} ({env.marimo_version})")
print(f"Pandas: {env.pandas_available} ({env.pandas_version})")
print(f"Polars: {env.polars_available} ({env.polars_version})")
print(f"Jupyter Notebook: {env.is_jupyter_notebook}")
print(f"Marimo Notebook: {env.is_marimo_notebook}")
Results will depend in your specific environment, but it will look something like this:
IPython: False ()
Marimo: True (0.19.5)
Pandas: True (3.0.0)
Polars: True (1.37.1)
Jupyter Notebook: False
Marimo Notebook: True